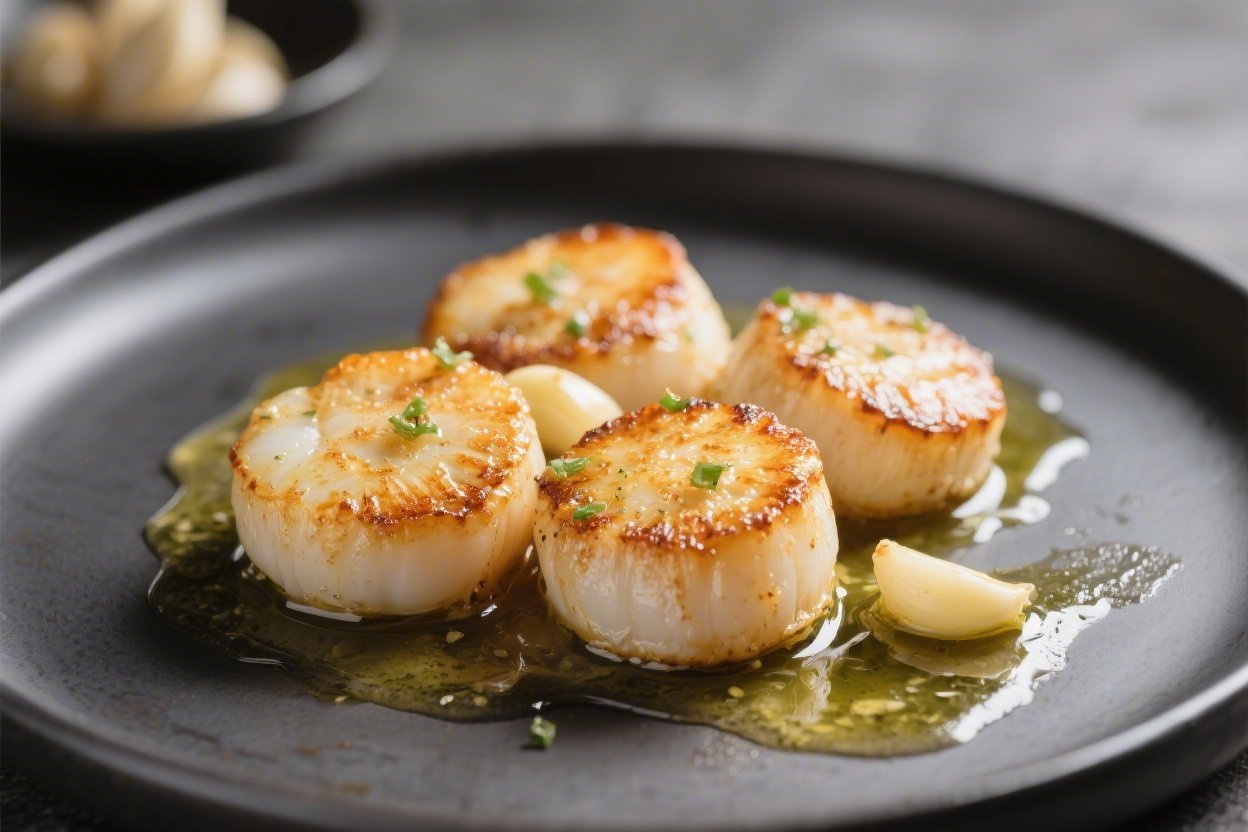
Garlic Butter Scallops – Simple, Golden, and Packed With Flavor
Pan-seared scallops in garlic butter are one of those dishes that feel special but take just minutes to make. The outside is golden and crisp, while the inside stays tender and silky. With a hot pan and a few pantry staples, you can create restaurant-quality results at home.
This recipe is quick enough for a weeknight and elegant enough for guests. If you’ve never cooked scallops before, don’t worry—this guide will walk you through every step with confidence.
Ingredients
Method
- Choose dry scallops. Look for “dry-packed” sea scallops. They sear better and taste sweeter. If yours are “wet-packed,” pat them extra dry and know they may release more liquid.
- Prep the scallops. Remove the small side muscle if attached—it peels off easily. Lay scallops on paper towels, top with another towel, and press gently to dry. Dry scallops are key to a good crust.
- Season simply. Right before cooking, sprinkle both sides with kosher salt and black pepper. Don’t season too early or they’ll draw moisture.
- Heat the pan. Set a large stainless steel or cast-iron skillet over medium-high heat. Add 1 tablespoon olive oil and 1 tablespoon butter. When the butter foams and just starts to brown, you’re ready.
- Sear in batches. Place scallops in the pan without crowding. You should hear a strong sizzle. Don’t move them for 1.5 to 2 minutes. They’re ready to flip when you see a deep golden edge forming.
- Flip and finish. Turn each scallop and cook another 1.5 to 2 minutes. They should feel springy, not firm. Transfer to a plate and tent lightly with foil while you make the sauce.
- Make the garlic butter. Turn heat to medium-low. Add 3 tablespoons butter to the pan. When melted, stir in minced garlic and cook 30–45 seconds until fragrant—don’t let it brown. If using, splash in white wine or stock to deglaze, scraping up browned bits.
- Brighten the sauce. Add lemon zest and a squeeze of lemon juice. Taste and adjust with salt, pepper, or more lemon. Stir in parsley and a pinch of red pepper flakes if you want heat.
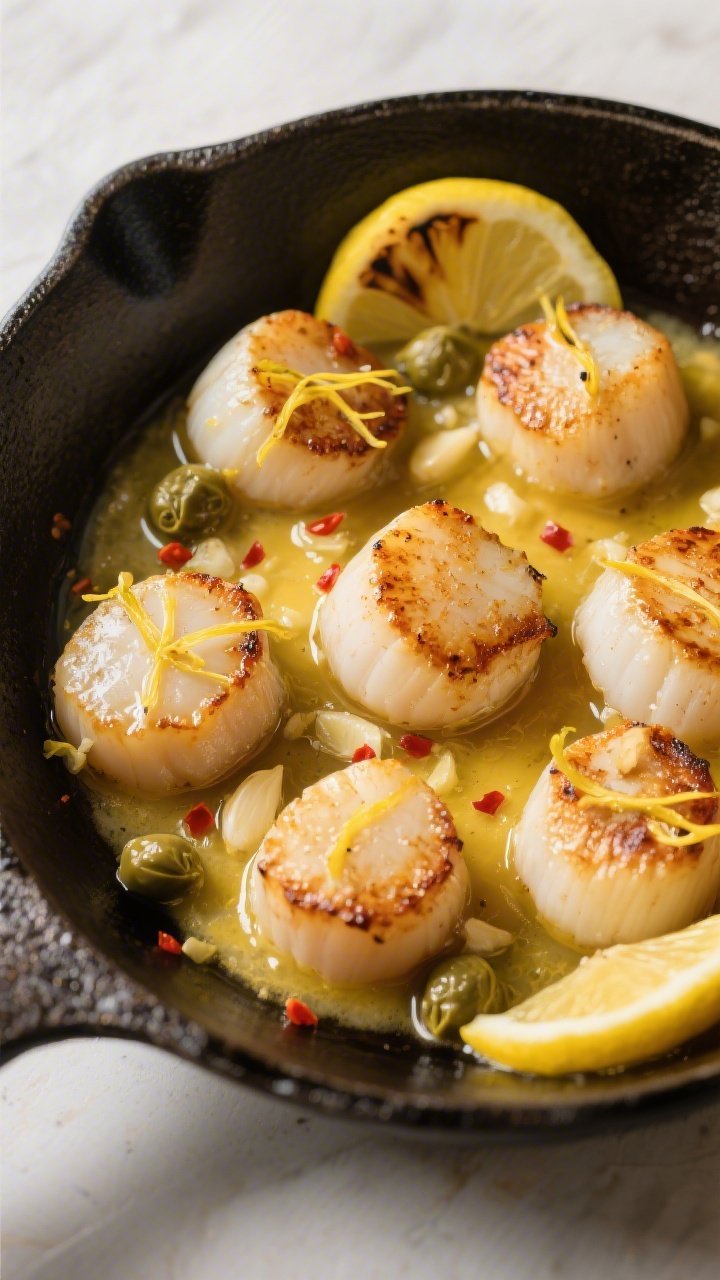
- Return scallops to the pan. Slide the scallops back in just long enough to coat with sauce, 15–20 seconds. Spoon the garlic butter over the top.
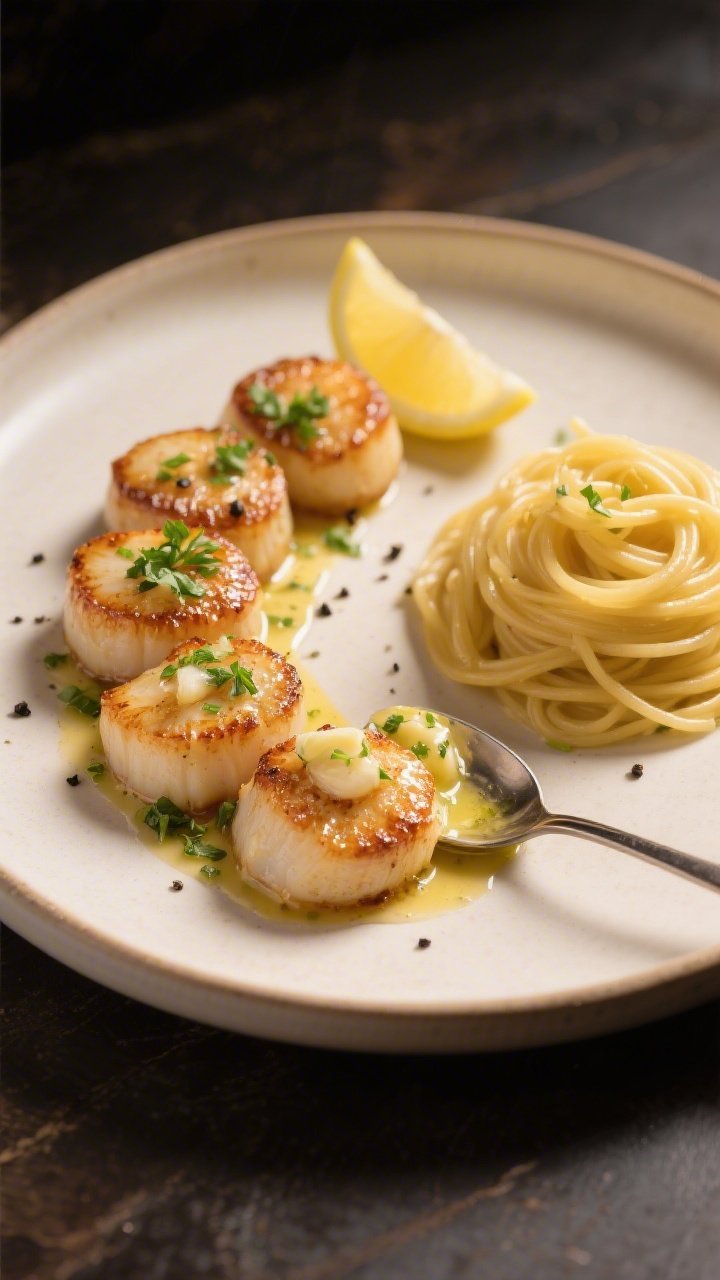
- Serve immediately. Scallops wait for no one. Plate them hot with extra sauce and lemon wedges on the side.

What Makes This Special
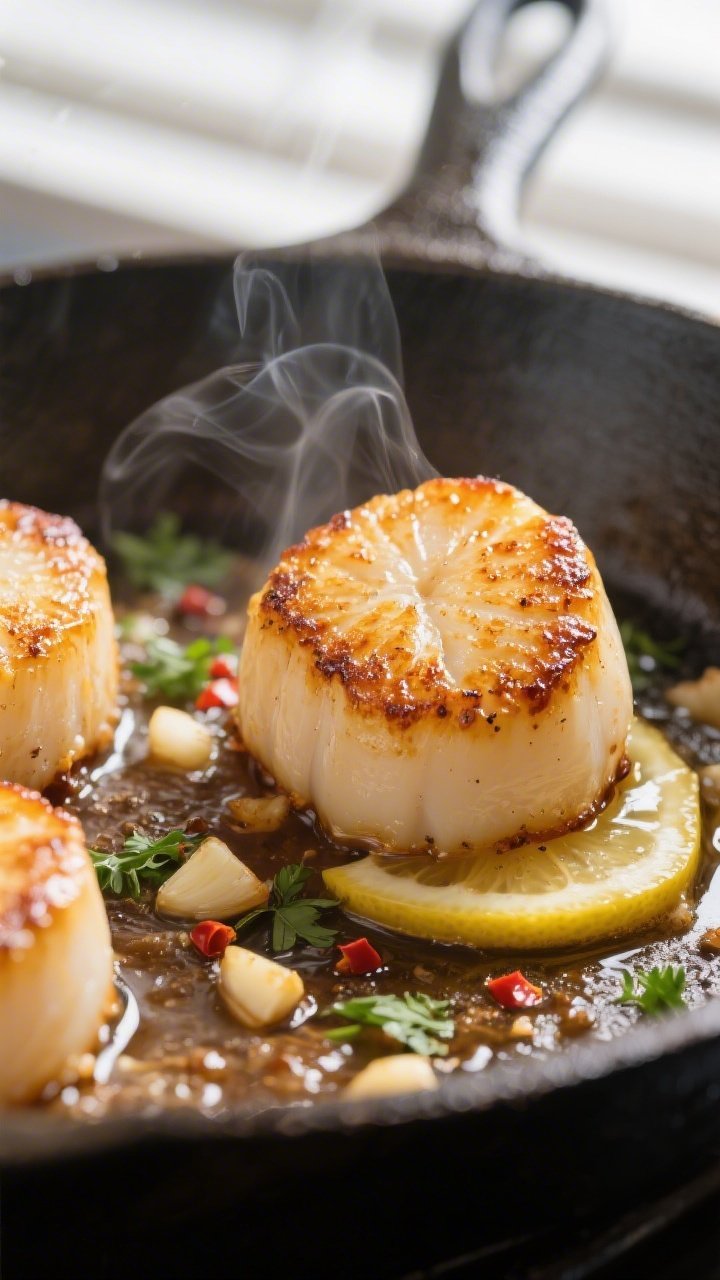
This dish is all about contrast: a caramelized crust on the outside and a delicate center. The garlic butter adds richness, while a splash of lemon keeps things bright.
It’s fast, fuss-free, and needs only a short list of ingredients. Best of all, you can serve it with almost anything—pasta, risotto, crusty bread, or a simple salad.
Shopping List
- Sea scallops (1 to 1.5 pounds), dry-packed if possible
- Unsalted butter (4 tablespoons)
- Olive oil (1–2 tablespoons)
- Garlic (3–4 cloves), finely minced
- Lemon (zest and juice of 1)
- Fresh parsley, chopped (about 2 tablespoons)
- Kosher salt and freshly ground black pepper
- Crushed red pepper flakes (optional)
- White wine or seafood stock (2–3 tablespoons) (optional, for deglazing)
- Neutral high-heat oil like avocado or grapeseed (optional, for extra searing power)
Step-by-Step Instructions
- Choose dry scallops. Look for “dry-packed” sea scallops. They sear better and taste sweeter.
If yours are “wet-packed,” pat them extra dry and know they may release more liquid.
- Prep the scallops. Remove the small side muscle if attached—it peels off easily. Lay scallops on paper towels, top with another towel, and press gently to dry. Dry scallops are key to a good crust.
- Season simply. Right before cooking, sprinkle both sides with kosher salt and black pepper. Don’t season too early or they’ll draw moisture.
- Heat the pan. Set a large stainless steel or cast-iron skillet over medium-high heat.
Add 1 tablespoon olive oil and 1 tablespoon butter. When the butter foams and just starts to brown, you’re ready.
- Sear in batches. Place scallops in the pan without crowding. You should hear a strong sizzle.
Don’t move them for 1.5 to 2 minutes. They’re ready to flip when you see a deep golden edge forming.
- Flip and finish. Turn each scallop and cook another 1.5 to 2 minutes. They should feel springy, not firm.
Transfer to a plate and tent lightly with foil while you make the sauce.
- Make the garlic butter. Turn heat to medium-low. Add 3 tablespoons butter to the pan. When melted, stir in minced garlic and cook 30–45 seconds until fragrant—don’t let it brown.
If using, splash in white wine or stock to deglaze, scraping up browned bits.
- Brighten the sauce. Add lemon zest and a squeeze of lemon juice. Taste and adjust with salt, pepper, or more lemon. Stir in parsley and a pinch of red pepper flakes if you want heat.
- Return scallops to the pan. Slide the scallops back in just long enough to coat with sauce, 15–20 seconds.
Spoon the garlic butter over the top.
- Serve immediately. Scallops wait for no one. Plate them hot with extra sauce and lemon wedges on the side.
Keeping It Fresh
- Buying: Fresh scallops should smell clean and slightly sweet, never fishy. If they look very wet or milky, they may be treated; choose dry-packed when possible.
- Storing: Keep raw scallops cold and cook within 24 hours.
Pat dry right before cooking.
- Leftovers: Scallops are best fresh. If you must store, refrigerate up to 1 day in an airtight container. Reheat gently over low heat with a bit of butter to avoid overcooking, or enjoy cold on a salad.
- Freezing: Raw, vacuum-sealed scallops freeze well.
Thaw overnight in the fridge, then dry thoroughly before searing.
Benefits of This Recipe
- Fast and impressive: From pan to plate in under 15 minutes.
- High in protein: Scallops are lean yet satisfying.
- Minimal ingredients: You need pantry basics to build big flavor.
- Versatile: Pairs well with pasta, risotto, mashed potatoes, rice, or simple greens.
- Beginner-friendly technique: Clear searing cues and timing help you nail the texture.
What Not to Do
- Don’t start with a wet pan or wet scallops. Moisture blocks browning and causes steaming.
- Don’t overcrowd. Too many scallops drop the pan temperature. Cook in batches for a proper sear.
- Don’t use low heat. You need medium-high heat for that caramelized crust.
- Don’t overcook. Overcooked scallops turn rubbery. Aim for just opaque with a springy feel.
- Don’t burn the garlic. Add it after searing and cook briefly to keep it sweet and fragrant.
Variations You Can Try
- Lemon Caper: Add a tablespoon of capers and a splash of extra lemon for a briny pop.
- Herb Butter: Swap parsley for chives, tarragon, or dill for a fresh twist.
- Spicy Garlic: Stir in Calabrian chili paste or more red pepper flakes for heat.
- Brown Butter Sage: Brown the butter until nutty and add a few torn sage leaves.
- Creamy Finish: Whisk in a splash of cream at the end for a velvety sauce.
- Citrus Swap: Try orange or grapefruit zest for a softer, aromatic note.
- Pasta Night: Toss cooked linguine with the garlic butter sauce and a handful of arugula, then top with scallops.
FAQ
How do I know when scallops are done?
They turn opaque and firm up slightly but still feel springy when pressed.
The center shouldn’t be hard. Most medium to large sea scallops need about 1.5 to 2 minutes per side on a hot pan.
Can I use frozen scallops?
Yes. Thaw them overnight in the fridge, then pat very dry before cooking.
Frozen, dry-packed scallops can be excellent when handled properly.
What’s the difference between sea and bay scallops?
Sea scallops are larger and ideal for searing. Bay scallops are smaller and sweeter but cook very fast and can overcook easily. For this recipe, choose sea scallops.
Why won’t my scallops brown?
They were likely too wet, the pan wasn’t hot enough, or the pan was crowded.
Use high heat, dry the scallops thoroughly, and sear in batches.
Do I need to remove the side muscle?
Yes. It’s a small, tough flap on the side. Peel it off before cooking for a better texture.
If you miss one, it’s harmless but chewier.
What pan works best?
Stainless steel or cast iron gives the best crust. Nonstick can work in a pinch but often browns less deeply.
Can I make this dairy-free?
Use a high-quality dairy-free butter substitute and olive oil. The flavor will change slightly, but you’ll still get a good sear and a tasty sauce.
What should I serve with garlic butter scallops?
Great sides include lemony risotto, buttered noodles, roasted asparagus, sautéed spinach, crusty bread, or a crisp green salad.
Is wine necessary for the sauce?
No.
It adds depth, but you can skip it or use a splash of seafood stock or water with an extra squeeze of lemon.
Can I marinate scallops?
It’s not recommended. Marinades can add moisture and prevent browning. Season simply with salt and pepper right before cooking.
In Conclusion
Garlic Butter Scallops deliver big flavor with little effort.
With dry scallops, a hot pan, and a light hand, you’ll get a perfect golden crust and a tender center every time. The simple garlic-lemon butter ties it all together and works with countless sides. Keep it hot, keep it quick, and enjoy a dish that tastes like a splurge without the stress.
Printable Recipe Card
Want just the essential recipe details without scrolling through the article? Get our printable recipe card with just the ingredients and instructions.